20240124 / TIL
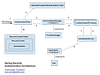
by jeongminySpring Security의 인증처리과정
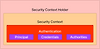
SecurityContext는 이 Authentication 객체를 담는 Container 역할을 하고,
SecurityContextHolder는 다시 SecurityContext 를 관리하는 역할을 한다고 볼 수 있습니다.
Authentication 인터페이스
public interface Authentication extends Principal, Serializable { Collection<? extends GrantedAuthority> getAuthorities(); Object getCredentials(); Object getDetails(); Object getPrincipal(); boolean isAuthenticated(); void setAuthenticated(boolean isAuthenticated) throws IllegalArgumentException; }
boolean isAuthenticated() 메서드와 void setAuthenticated(boolean isAuthenticated) 메서드는 Spring Security의 Authentication 인터페이스에 정의된 메서드입니다. 이 둘의 차이점은 다음과 같습니다:
- boolean isAuthenticated(): 이 메서드는 현재 사용자의 인증 여부를 나타내는 값을 반환합니다. 즉, 사용자가 인증되었는지 여부를 확인할 수 있습니다. 반환되는 값은 true 또는 false입니다. 이 메서드는 주로 인증된 사용자의 권한을 확인하거나 보안 관련 로직에서 사용됩니다.
- void setAuthenticated(boolean isAuthenticated) throws IllegalArgumentException: 이 메서드는 사용자의 인증 여부를 설정합니다. isAuthenticated 매개변수에 전달된 값에 따라 사용자의 인증 상태를 변경합니다. true를 전달하면 사용자가 인증되었다는 것을 나타내고, false를 전달하면 사용자의 인증이 해제되었다는 것을 나타냅니다. 이 메서드는 주로 보안 관련 로직에서 사용되며, 인증 과정에서 인증 여부를 강제로 변경해야 할 때 유용합니다. IllegalArgumentException이 발생할 수 있으며, 이는 잘못된 인자 값이 전달되었을 때 발생합니다.
요약하자면, isAuthenticated() 메서드는 현재 사용자의 인증 여부를 반환하는 반면, setAuthenticated(boolean isAuthenticated) 메서드는 사용자의 인증 여부를 설정합니다. 이를 통해 인증된 사용자의 상태를 확인하고, 필요에 따라 인증 여부를 변경할 수 있습니다.
Authentication 설정
//비어있는SecurityContext 객체를 생성 val context: SecurityContext = SecurityContextHolder.createEmptyContext() //TestingAuthenticationToken(인증정보가 담김) 객체를 생성 <- Authentication의 구현체 val authentication: Authentication = TestingAuthenticationToken("username", "password", "ROLE_USER") //비어있는context에 생성된 authentication를 담아준다. context.authentication = authentication //새로담은 context를 SecurityContextHolder에 담아준다. SecurityContextHolder.setContext(context)
- val context: SecurityContext = SecurityContextHolder.createEmptyContext(): 먼저, 빈 SecurityContext 객체를 생성합니다. SecurityContext는 현재의 보안 컨텍스트를 나타내는 인터페이스입니다.
- val authentication: Authentication = TestingAuthenticationToken("username", "password", "ROLE_USER"): 다음으로, TestingAuthenticationToken을 사용하여 테스트용 Authentication 객체를 생성합니다. 이 객체는 사용자의 인증 정보를 나타내며, "username"과 "password"를 사용하여 인증 정보를 설정하고 "ROLE_USER" 권한을 부여합니다.
- context.authentication = authentication: 생성한 authentication 객체를 context의 authentication 프로퍼티에 할당합니다. 이를 통해 SecurityContext에 사용자의 인증 정보가 설정됩니다.
- SecurityContextHolder.setContext(context): 마지막으로, SecurityContextHolder의 setContext() 메서드를 사용하여 context를 설정합니다. 이를 통해 현재 실행 중인 스레드의 SecurityContext를 지정된 값으로 설정합니다.
위의 코드를 실행하면, SecurityContextHolder에 설정된 SecurityContext와 그 안에 포함된 Authentication 객체가 현재 스레드에 연결됩니다. 이를 통해 Spring Security는 현재 사용자의 인증 정보를 추출하고, 권한 검사 등의 보안 기능을 수행할 수 있게 됩니다.
Authentication 조회
val context = SecurityContextHolder.getContext() val authentication = context.authentication val username = authentication.principal val authorities = authentication.authorities
- val context = SecurityContextHolder.getContext(): SecurityContextHolder를 사용하여 현재 실행 중인 보안 컨텍스트를 가져옵니다. 이를 context 변수에 할당합니다.
- val authentication = context.authentication: SecurityContext 객체의 authentication 속성을 사용하여 현재 사용자의 인증 정보를 가져옵니다. 이를 authentication 변수에 할당합니다.
- val username = authentication.principal: authentication 객체의 principal 속성을 사용하여 현재 사용자의 이름을 가져옵니다. principal은 인증 주체를 나타내며 일반적으로 사용자 이름 또는 사용자 객체를 포함합니다. 이를 username 변수에 할당합니다.
- val authorities = authentication.authorities: authentication 객체의 authorities 속성을 사용하여 현재 사용자의 권한 목록을 가져옵니다. authorities는 사용자가 가지고 있는 권한을 나타내는 컬렉션입니다. 이를 authorities 변수에 할당합니다.
따라서, 주어진 코드는 현재 사용자의 인증 정보에서 사용자 이름과 권한을 추출하여 각각 username과 authorities 변수에 저장하는 과정을 나타냅니다. 이를 통해 애플리케이션에서 현재 사용자의 정보를 활용할 수 있습니다.
인증 과정의 핵심
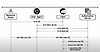
인증 처리를 Filter와 다른 객체들로 분리하는 것은 음식 주문과 비슷한 개념입니다. Filter는 주문을 받아서 요청된 음식의 정보를 가공하고, Authentication 객체에 해당 정보를 담아줍니다. 그리고 나머지 객체들은 이 Authentication 객체를 기반으로 실제로 음식을 만들고 인증을 처리하는 역할을 담당합니다.
예를 들어, 고객이 음식점에 주문을 한다고 가정해봅시다. 이때 고객은 주문서에 자신의 이름, 주소, 주문할 음식 등을 적어서 제출합니다. 여기서 주문서는 HTTP 요청을 의미하고, 주문서에 적힌 정보는 HTTP 요청으로부터 전달된 데이터입니다.
이때 주문을 받는 역할을 하는 것이 Filter입니다. Filter는 주문서를 받아서 그 안에 있는 정보를 추출하고, 이를 Authentication 객체에 담아줍니다. 예를 들어, 주문서에 있는 이름과 비밀번호를 Authentication 객체에 저장합니다.
그리고 Filter는 이 Authentication 객체를 다른 객체들에게 전달합니다. 이때 다른 객체들은 Authentication 객체를 기반으로 실제로 음식을 만들고 인증을 처리합니다. 예를 들어, 주문서에 있는 이름과 비밀번호를 기반으로 실제로 고객을 확인하고, 올바른 주문인지를 확인합니다. 이 역할은 Filter가 아닌 다른 객체들이 수행합니다.
이렇게 Filter는 주문서(요청)를 받아서 그 안에 있는 정보를 추출하여 Authentication 객체에 담아주는 역할을 하고, 그 후에는 다른 객체들이 이 Authentication 객체를 활용하여 실제 인증을 처리하는 역할을 담당합니다. 이를 통해 인증 처리를 필요한 객체들에게 위임하고, 코드의 유연성과 재사용성을 높일 수 있습니다.
Spring Security는 이러한 인증 처리를 위한 다양한 요소들을 제공하며, 개발자들이 Filter와 다른 객체들을 조합하여 효과적인 인증 처리를 구현할 수 있도록 도와줍니다.
AuthenticationManager
AuthenticationManager는 Spring Security에서 인증을 수행하는 핵심 인터페이스입니다. AuthenticationManager는 실제로 인증을 처리하는 역할을 담당하며, 주어진 인증 정보를 기반으로 사용자의 신원을 확인합니다.
개념적으로는 AuthenticationManager는 음식을 만드는 주방장과 비슷합니다. 주문서(요청)를 받은 Filter는 주문서에 있는 정보를 추출하여 Authentication 객체에 담고, 이 Authentication 객체를 AuthenticationManager에게 전달합니다. 그럼 AuthenticationManager는 해당 사용자의 신원을 확인하기 위해 필요한 검증(인증) 작업을 수행합니다.
AuthenticationManager는 주로 Spring Security의 ProviderManager 클래스를 사용하여 구현됩니다. ProviderManager는 다양한 인증 제공자(인증 방식)들을 관리하고, 각각의 인증 제공자에게 Authentication 객체를 전달하여 인증을 처리하도록 위임합니다. 예를 들어, 사용자명/비밀번호를 사용한 폼 기반 인증, 토큰 기반 인증, 소셜 미디어 인증 등 다양한 인증 방식을 지원할 수 있습니다.
AuthenticationManager를 사용하여 인증을 처리하면, Filter는 주문서(요청)에서 추출한 인증 정보를 Authentication 객체로 만들고, 이를 AuthenticationManager에게 전달하는 역할을 수행합니다. AuthenticationManager는 전달받은 Authentication 객체를 실제 인증 제공자에게 전달하여 인증을 처리하고, 인증 결과를 반환합니다.
따라서, AuthenticationManager는 Spring Security에서 인증 처리를 담당하는 핵심 인터페이스로서, 실제 인증을 처리하는 객체들과의 상호작용을 관리하고, 주어진 인증 정보를 기반으로 사용자의 신원을 확인합니다.
ProviderManager
ProviderManager는 Spring Security에서 AuthenticationManager 인터페이스를 구현한 클래스 중 하나입니다. ProviderManager는 다양한 인증 제공자들을 관리하고, 실제 인증 처리를 위임하는 역할을 수행합니다.
ProviderManager는 주로 Spring Security의 인증 제공자들을 관리하고 실행하는 역할을 담당합니다. 여러 개의 인증 제공자를 등록하고, 받은 Authentication 객체를 각각의 인증 제공자에게 전달하여 인증을 처리합니다. 각 인증 제공자는 자체적인 인증 방식에 따라 사용자의 신원을 확인하고 인증 결과를 반환합니다.
예를 들어, 사용자명/비밀번호를 사용한 폼 기반 인증과 토큰 기반 인증을 동시에 지원해야 한다고 가정해봅시다. 이 경우 ProviderManager는 폼 기반 인증 제공자와 토큰 기반 인증 제공자를 등록하고, 받은 Authentication 객체를 각각의 제공자에게 전달하여 인증을 처리합니다. 이렇게 함으로써 어떤 인증 방식을 사용하는지에 따라 적절한 인증 제공자가 선택되어 인증이 처리됩니다.
ProviderManager는 AuthenticationManager 인터페이스의 구현체로서, 다양한 인증 제공자들을 관리하고 주어진 Authentication 객체를 해당 인증 제공자에게 전달하여 인증을 처리합니다. 이를 통해 Spring Security는 다양한 인증 방식을 유연하게 지원하며, 개발자는 필요한 인증 제공자를 등록하여 인증 처리를 구성할 수 있습니다.

AuthenticationProvider
`AuthenticationProvider`는 Spring Security에서 인증을 처리하는 인터페이스입니다 `AuthenticationProvider`는 `AuthenticationManager`에 의해 호출되어 실제로 인증을 수행하는 역할을 합니다.
`AuthenticationProvider`는 주어진 `Authentication` 객체를 통해 사용자의 신원을하고, 인증 결과를 반환합니다. 인증 과정에서는 주로 사용자명/비밀번호의 일치 여부를 확인하거나, 토큰의 유효성을 검증하는 등의 작업을 수행합니다. 각각의 인증 방식에 따라 구체적인 인증 로직이 달라질 수 있습니다.
Spring Security에서 제공하는 `AuthenticationProvider`의 구현체로는 일반적으로 `DaoAuthenticationProvider`가 사용됩니다. `DaoAuthenticationProvider`는 사용자 정보를 데이터베이스 등의 저장소에서 조회하여 인증을 처리합니다 사용자명/비밀번호를 사용한 폼 기반 인증을 지원하는 경우에 주로 사용됩니다. 그 외에도 다른 인증 방식을 지원하기 위해 `AuthenticationProvider`를 직접 구현할 수도 있습니다.
`AuthenticationProvider`는 `AuthenticationManager`에 등록되어 사용됩니다. `AuthenticationManager`는 주어진 `Authentication` 객체를 등록된 `AuthenticationProvider`에게 전달 인증을 처리합니다. `AuthenticationProvider`는 주어진 `Authentication` 객체를 기반으로 인증을 수행하고, 인증 결과를 반환합니다. `AuthenticationManager`는 여러 개의 `AuthenticationProvider`를 등록할 수 있으며, 등록된 `AuthenticationProvider` 중에서 적절한 인증 제공자를 선택하여 인증을 처리합니다.
따라서, `AuthenticationProvider`는 Spring Security에서 실제로 인증을 처리하는 인터페이스로서, 주어진 `Authentication` 객체를 기반으로 사용자의 신원을 확인하고, 인증 결과를 반환합니다. `AuthenticationProvider`는 `Manager`에 등록되어 사용되며, 다양한 인증 방식을 지하기 위해 구현될 수 있습니다.
Spring Security - 3. 인증 절차를 정의하는 AuthenticationProvider
https://gregor77.github.io/2021/05/18/spring-security-03/

Frontend 게임 >.<

블로그의 정보
꿈틀꿈틀 개발일기
jeongminy